Top 10 Tips to Design Your Own Circuit Board Easily?
In the world of electronics, the ability to design your own circuit board is a valuable skill. According to recent industry reports, the global PCB market is projected to reach $83 billion by 2026, driven by advancements in technology. This trend underscores the growing demand for personalized electronic solutions, making it more important than ever to learn how to create custom circuit boards.
Designing your own circuit board can seem daunting. However, with the right tools and knowledge, it can be a rewarding experience. For instance, using software like KiCad or Eagle can simplify the design process. Moreover, understanding the basic components and layout strategies is crucial. Many aspiring engineers often overlook the importance of planning. Skipping steps can lead to design flaws or inefficiencies that may hinder performance.
Ultimately, the journey of designing your own circuit board is unique for everyone. It often involves trial and error, which can be frustrating. Yet, this process is essential for growth. As you face challenges, you'll gain insights that will sharpen your skills. Embracing these experiences can turn setbacks into valuable learning opportunities in this dynamic field.

Choosing the Right Software for Circuit Board Design
Choosing the right software for circuit board design is crucial for both beginners and experienced designers. With many options available, it can be overwhelming. Look for software that offers an intuitive interface. A user-friendly design can greatly reduce the learning curve. Test a few programs to see which one feels best under your fingers.
Consider the features you really need. Some software may have advanced capabilities that you might never use. Simplicity can often be more effective. Pay attention to the library of components offered. A good selection can save you time. Additionally, check for compatibility with various export formats. This ensures smooth transitions to manufacturing.
Don't overlook the importance of community support. A vibrant forum can be a valuable resource. You can exchange ideas and troubleshooting tips. It's comforting to know others have faced similar challenges. Sometimes, the feedback from users can highlight software flaws. This can lead to better choices in the long run.
Understanding Circuit Board Components and Layouts
Understanding the components of a circuit board is vital for effective design. Each element serves a purpose, influencing functionality and layout. Resistors, capacitors, and microcontrollers interact within a defined space. A misplaced component can lead to malfunction. Small errors can cause big problems.
When planning your layout, consider element placement. Keep similar components close to minimize interference. Routing traces should be as short as possible. This helps reduce resistance and signal delay. Using a software tool can aid in visualizing your circuit. However, these tools have limitations. They may not accurately predict real-world performance.
Testing prototypes is crucial. Even experienced designers face unexpected challenges. The circuit board may not perform as intended. Frequent revisions are part of the process. Embrace mistakes as learning opportunities. Each iteration will help refine your design and improve understanding of the components.
Creating a Schematic Diagram for Your Circuit
Creating a schematic diagram is a foundational step in designing your own circuit board. This visual representation helps clarify how components interact. Begin by selecting your components carefully. Resistors, capacitors, and ICs all serve unique roles. Each element should be placed with clear pathways. These connections represent electrical flow. Use consistent symbols and labeling. This promotes understanding and reduces errors.
After creating a basic layout, consider potential pitfalls. Component placement can affect circuit performance. Ensure there is enough space for soldering. Overlapping connections may cause confusion. Always check for shorts or disconnections. A well-organized schematic reduces these mistakes. Remember to reflect on your design as you progress. Revisiting your diagram allows for critical thinking and adjustments.
Testing your schematic is equally essential. Utilize simulation software to visualize performance before physical assembly. Analyze output results and adjust components if necessary. This step minimizes risks in the prototyping phase. Your design will evolve, so embrace iterations. Creating a schematic is not just a task, but a learning journey. Each revision brings new insights that refine your skills.
Top 10 Components Used in DIY Circuit Design
Designing the PCB Layout and Routing Connections
Designing your PCB layout is a critical step. It requires careful planning and precision. Start by understanding the components you'll use. Their placement impacts the overall functionality. Keep power and ground paths short to reduce noise. A compact layout is often beneficial for performance.
When it comes to routing connections, there are various techniques to consider. Use trace widths that match the current requirements. Narrow traces can lead to overheating. Don’t forget about clearance between traces. This prevents accidental shorts. For complex designs, multiple layers might be necessary. It’s vital to organize layers logically.
Errors can occur, even to experienced designers. They may overlook essential aspects, like via placement. Always double-check your work. Simulations can help visualize potential issues. Be prepared to revise your layout based on feedback. This iterative process may feel slow, but it enhances reliability. Your final product will benefit from careful attention to detail.
Testing and Prototyping Your Circuit Board Design
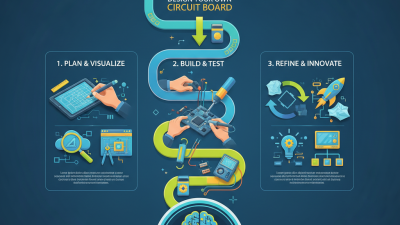
Testing and prototyping are crucial stages in circuit board design. Proper testing ensures functionality and reliability, while prototypes help identify issues early. According to industry reports, more than 30% of projects face delays due to design errors. This highlights the importance of a thorough testing phase.
When designing your circuit board, consider creating multiple prototypes. Each iteration reveals flaws. This iterative process refines your design. For instance, running simulations can predict performance under different conditions. Use software tools that identify potential short circuits or layout mistakes. These tools can save time in the long run and reduce costs.
Don’t overlook the testing phase. Build simple prototypes first. This allows you to evaluate basic functions. Gather feedback from these tests. Learn from failures. Each setback can lead to improvements in your final design. Additionally, maintaining a clear documentation during this process can assist in troubleshooting later. Tracking adjustments helps ensure that you can replicate successful outcomes in future projects.